This page contains a selection of photos from Ian M in Dunedin, New Zealand.
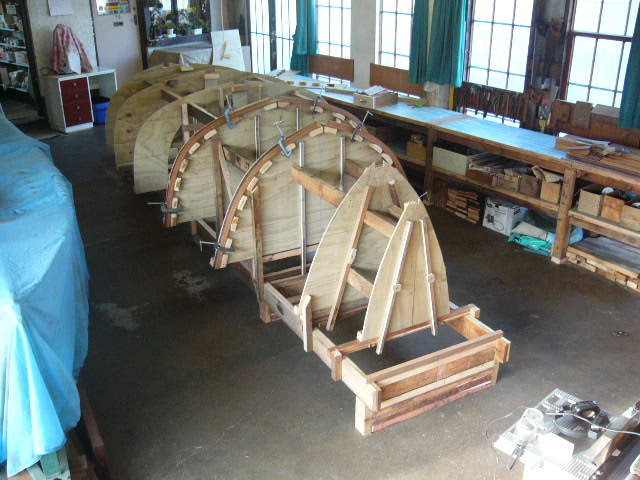
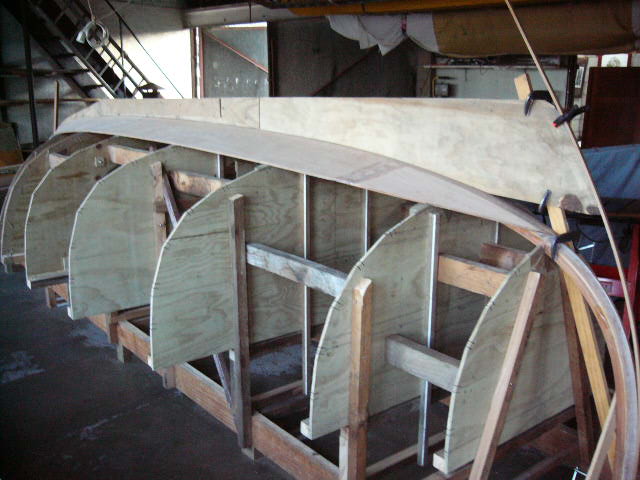
Update 10 Dec 2005 - Planking completed
Update 26 March 2006 - Turned over
Update 4 August 2006 - Bilge cases/Bilge keels/Ballast
dummy
Update 18 September 2006 - Winch parts and bulkheads
Update 30 December 2006 - Ballast, cockpit, lockers, motor well
Update 26 February 2007 - Fitting out
Updated 13 May 2007 - Trailer and transducers
Updated 26 August 2007 - Deck framing
Updated 27 September 2007 - Decking and fitting out
Updated 30 October 2007 - Deck fittings & more finishing touches
Updated 16 January 2008 - Interior & electrics
Updated 17 February 2008 - Forehatch, tabernacle & anchor box
Updated 14 April 2008 - Hull complete and ready to launch!
Updated 15 April 2008 - Launching day!!
Updated 26 May 2008 - Laminated tiller
Updated 12 September 2008 - Spars
Updated 7 February 2009 - First cruise (and some detailed shots)
Sailing!
Ian's building frame looks wonderfully sturdy (and what a great workshop).
This photo shows the garboards in place, and the deadwood mocked up out of scrap plywood.

Here's the actual keel in place.
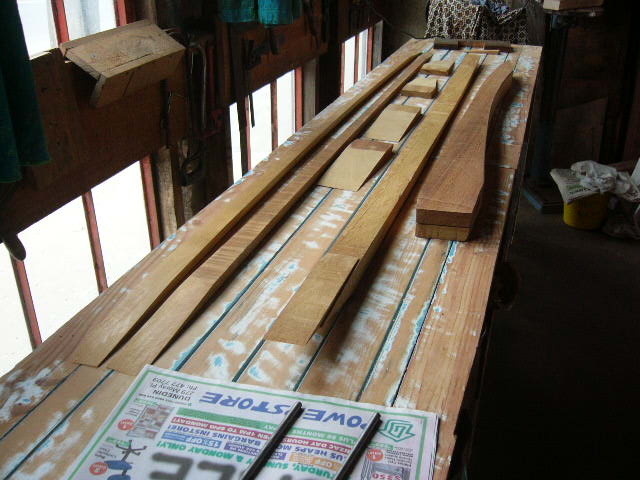
Here is a selection of more keel photos from Ian, with some of the words he sent me...
"Here are some photos of my keel and deadwood construction. One of my 5m planks of tatajuba (nominally 300 x 40mm) was actually 320 x 35, so I cut it into 200 and 120 widths by the length of the stern section and took them down to 30mm on my 250mm thickness planer. By manoeuvring the patterns I got the stern and bow pieces out of the one plank, and a bit left over. For the middle section where the lead goes, I used a couple of pieces 60 x 40mm x 2m I had previously cut from another plank to make the outer stem laminations later, but will probably use kwila for those now. One piece went down the middle and the other made the widening pieces on each side. The rest of the fairing pieces were made from the off-cuts of the keelson. I arranged the deadwood assembly so that the horizontal joints were staggered. I routered grooves for the bolts and filled them with glue as I assembled the pieces flat on the bench, but should have supported the bolts 25mm off the bench, as they sank to slightly off-centre. So then I had to drill the holes in the keelson bigger. They ended up at 15mm, for 10mm bolts. The bolts are actually 10mm threaded rod, of stainless steel 316. This is what Duckflat uses. The inner nuts are just done up on temporary wooden washers so far, with parcel tape masking."

Here is a selection of Ian's "planking completed" pictures, along with some of his words. (He's well and truly overtaken me now - Richard A.)
"Here are some photos of my Eun Mara, all planked up and stems on. You can see how the tatajuba timber goes darker when exposed to the air for a while. I glued all the scarfs on the boat, as you did, but used plywood clamps on all the laps, with screws at the moulds after my hiccup with plank 2. I glued the stem laminations on 2 at a time. I think what I still have to do before I turn it over, is to finish the filleting and fairing, cut the slots, make and install the bilge-keels, put a couple of layers of fibreglass cloth along the bottom of the keel and bilge-keels, coat the whole thing with resin to provide a consistent surface, paint the bottom, and put a brass strip along the centre of the keel. I will have to mask the slots so I can put fibreglass cloth around the edges later."
.jpg)
.jpg)
.jpg)
.jpg)
.jpg)
.jpg)
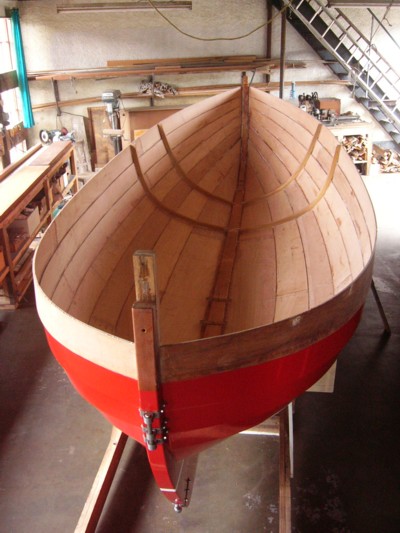
Update 26 March 2006 - Turned over
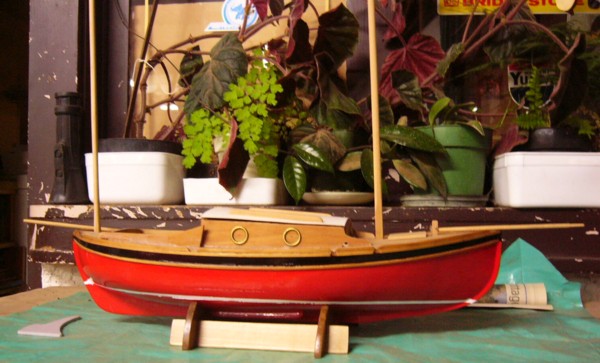
Looks like Ian made a model to check out his eventual colour scheme etc. Great idea, and beautifully executed. (Either that or they have some giant pot plants in New Zealand.)
Here are Ian's words regarding the turning over:
"We turned over the hull of my Eun Mara last Saturday, 18th March 2006. We had about 20 people here, and the job took 20 minutes. I had it all ready, and we rolled the hull over onto piles of old tyres, and then carried it back onto the building frame with padded rope slings under it, onto more old tyres in strategic places, after I had removed the posts that had supported the moulds. (Moulds 3, 5 and 7 were still in the boat at that stage.) Then we had a bit of a party. I levelled it up later, with tackles from the ceiling beams. I had first put pencil to plywood, to make the moulds, on 8th April 2005, so I am quite pleased to have turned it over within a year. Here are some photographs. The real boat will probably have a grey painted deck. The cabin-roof of the model is just a piece of cardboard so far. The hull is finished with two coats of epoxy resin, then a good one-pot brushed-on paint system. I painted the hull while the rudder fittings were being made locally, according to the Shetland captive bolt system (see WoodenBoat 118, June 1994), and then installed the fittings while the hull was still upside down. You can see that the pintles are not on the same axis, but the lower one is aimed at the centre of the upper bearing and the gudgeons are sufficiently ring-shaped to let it work. We saw this system on a lot of boats in Shetland and Norway, particularly at the Unst Boat Haven and the Small Boat Hall at the Oslo Maritime Museum, on our big trip in 2004. The local racing yoals in Shetland were pretty colourful too.
I have also had the steel plates cut for the bilge boards and the rudder, finished them with my angle-grinder, and had them hot-dip galvanised after the pins had been welded in. I am going to use 20mm pivot pins for the bilge plates, with PTFE bushes. The rudder-plate has a lug left on it to form a positive stop when it is down, and I will insert a pin through the body of the rudder below the lug when the plate is up, so it will not be hanging on the cord all the time.
The open hull looks to me a lot like the Hebridean galley Aileach (Classic Boat, January 2000), obviously of Norse ancestry."

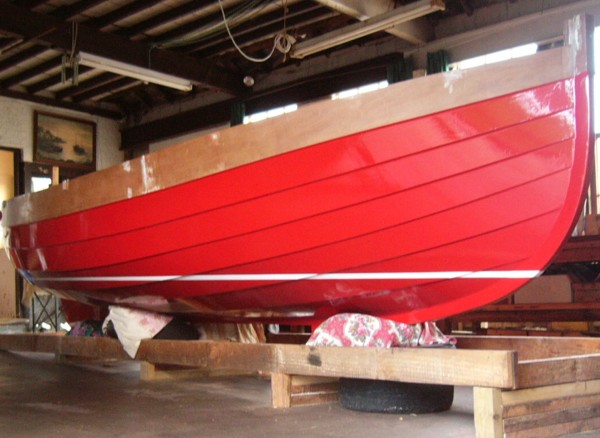
I love this waterline view - Richard A
I asked Ian for some more information about painting and preparation (as I am about at that stage). Here is his response:
"By the time I had done all the filletting and fairing of the hull there was already a fair amount of epoxy on the outside of it, so I coated the whole thing with the same resin (Norski brand, from Blenheim, NZ) - two coats on the same day. That was on Boxing Day. I used a roller for that, but ended up with a bit of that orange-peel textured effect, so I rubbed it down with fine steel wool. I should have brushed out the resin when I put it on. Some time later I gave it another sanding with fairly fine sandpaper, masked out the bits where the bilge-keels and rudder fittings were going to go, and the sheerstrake, and gave the rest of it two coats of Altex primer/undercoat (grey). (That was on 3-4 February, after numerous interruptions.) The local Altex agent said a separate undercoat over that was not required. So then I painted it with one coat of Altex one-pot enamel, "Bengal Red", brushed on, decided it was too much like a "dark orange", got the agent to tint it a bit redder, painted it again, decided it was too "pink", put a little bit of black pigment in it myself and painted the hull again, but the colour then looked a little uneven, so I gave it another coat (the fourth topcoat) of the same and it came out OK, as you see it now. I'll settle for that! I had a four litre tin, and I think I've still got enough for the rudder and bilge keels. I am not using anti-fouling as I expect the boat will be on its trailer more than in the water, and I am not putting a metal shoe along the keel at this stage as I have put a couple of layers of something called "Norski Epoxy Carborundum" along the keel and bilge-keels instead. It is a two-part epoxy mixture designed for protecting the hulls of jet-boats, and the decks of fishing boats where cray-pots and anchors get dumped on them. I'll see how that goes. It was easy enough to paint the whole hull in one go. It took one day for one coat, or about 20 minutes per plank. I dry-fitted the rudder fittings when I got them, after the third topcoat, so after I had sealed the holes and painted those parts the fourth coat was continuous over those areas. The sheerstrake will be black, eventually, as you see on the model. I think that will set it off nicely. I was not intending to varnish it, with the white filler showing at the scarfs. For the boot-top, I had marked the waterline on planks 1 and 2 (after the garboard) with a spirit level from the next exposed mould, then finished the line with a cheap laser level and pencil after the planking was completed, then did the top edge the same way. Then I used a centre punch to make pairs of small dents at the station lines which showed through the paint later well enough to connect them up again with the laser line, put on masking tape and paint two coats of white over the red. At each stage I took the masking tape off while each coat was still wet and remasked it for the next coat. "